![]()
The
Format Columns function allows you to pick the font styles for the various
columns.
Select
the Format Columns (![]() ) toolbar button in the Data Table Window to present the Format Columns window:
) toolbar button in the Data Table Window to present the Format Columns window:
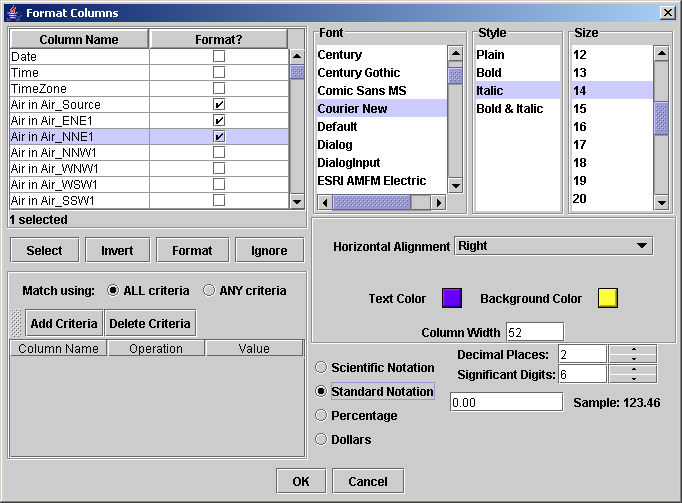
The table at the top left lists all of the column names and whether or not the columns should be formatted according to the specifications in the table on the right. A check in the "Format?" column indicates that a given column will be formatted according to the specifications on the right when you click OK. Check and un-check the "Format?" check boxes by clicking the mouse in them. Use the vertical scroll bar on the right to move up and down through the tables.
Click the Format or Ignore buttons to check/un-check all of the selected boxes in the "Format?" column in the table on the left.
Click Invert to automatically de-select the blue rows and select those that were white.
|
You may also choose to format columns whose names meet certain criteria (using the box on the lower left of the window):
|
After selecting the appropriate columns for formatting, click on the appropriate font, font style (plain, bold, italic, or bold & italic), and font size in the Font, Style, and Size columns in the table on the right. The horizontal alignment of the text should be set to Left, Center, or Right using the pull-down menu in the Horizontal Alignment field.
To change the text color or the background color, click the mouse pointer on the Text Color or Background Color box to open a dialog box that enables you to choose the color three different ways. Click on the Swatch tab to pick a color from a chart directly, click on the HSB tab to specify the hue, saturation, and brightness, or click on the RGB tab to indicate the levels of red, green, and blue to be used in the color. Click OK on the dialog box to pick this color, Cancel to keep the previously selected color, or Reset to change the color back to the previously selected color.
Type a whole number in the Column Width field to set the number of pixels that should be used across the formatted columns. The minimum column width is 15 pixels, and each character requires approximately 5 pixels (for the Normal Dialog font at 12 point size).
If the selected columns contain numeric values, you may set the number of decimal places (digits to the right of the decimal place) in the Decimal Place field, the number of significant digits in the Significant Digits field, and select the Scientific or Standard Notations radio buttons, Percentages or Dollars radio buttons as necessary. You may also type a format style into the Sample field to the left of the prompt.
Click OK to format the selected columns on the Data Table Window and close the Format Columns window.
Click Cancel to close the Format Columns window without making any changes.
Click the Reset
(![]() ) toolbar button on the Data Table Window to return the
original display of all columns.
) toolbar button on the Data Table Window to return the
original display of all columns.