|
 |
|
Thirstin Builds an Aquifer in a Cup (Aquifer on the Go)
 Background Background
Many communities obtain their drinking water from underground sources called aquifers. Water suppliers or utility officials often drill wells through soil and rock into aquifers for the ground water contained therein to supply the public with drinking water. Home owners who cannot obtain their drinking water from a public water supply, will have their own private wells drilled on their property. Unfortunately, ground water can become contaminated by harmful chemicals, such as lawn care products and household cleaners that were used or disposed of improperly, and any number of other pollutants, that can enter the soil and rock, polluting the aquifer and eventually the well. Such contamination can pose a significant threat to human health. The measures that must be taken by well owners and water plant operators to either protect or clean up contaminated aquifers are quite often costly.
Note: This demonstration should follow a class discussion on potential sources of pollution to drinking water supplies.
Objectives
To illustrate how water is stored in an aquifer, how ground water can become contaminated, and how this contamination ends up in a drinking water well. Ultimately, students should get a clear understanding of how careless use and disposal of harmful contaminants above the ground can potentially end up in the drinking water below the ground. This particular experiment can be done by each student at their work station.
Materials needed per student
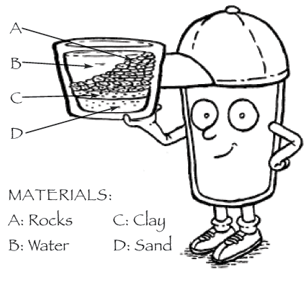
- 1 clear plastic cup that is 2 3/4" deep x 3 1/4" wide for each student
- 1 piece of modeling clay or floral clay that will allow a 2" flat pancake to be made by each student for their cup
- White play sand that will measure 1/4" in bottom of each student's cup
- Aquarium gravel (natural color if possible) or small pebbles (approximately 1/2 cup per student)
(HINT: As many small rocks may have a powdery residue on them, you may wish to rinse and dry them on a clean towel prior to use. It is best if they do not add cloudiness to water.)
- Red food coloring
- 1 bucket of clean water and small cup to dip water from bucket
Procedure
- Pour 1/4" of white sand in the bottom of each cup completely covering the bottom of the container. Pour water into the sand, wetting it completely ( there should be no standing water on top of sand). Let students see how the water is absorbed in the sand, but remains around the sand particles as it is stored in the ground and ultimately forming part of the aquifer.
- Have each student flatten the modeling clay (like a pancake) and cover 1/2 of the sand with the clay (have each student press the clay to one side of the container to seal off that side). The clay represents a "confining layer" that keeps water from passing through it. Pour a small amount of water onto the clay. Let the students see how the water remains on top of the clay, only flowing into the sand below in areas not covered by the clay.
- Use the aquarium rocks to form the next layer of earth. Place the rocks over the sand and clay, covering the entire container. To one side of the cup, have students slope the rocks, forming a high hill and a valley (see Thirstin's illustration). Explain to students that these layers represent some of the many layers contained in the earth's surface. Now pour water into your aquifer until the water in the valley is even with your hill. Students will see the water stored around the rocks. Explain that these rocks are porous, allowing storage of water within the pours and openings between them. They will also notice a "surface" supply of water (a small lake) has formed. This will give them a view of both the ground and surface water supplies which can be used for drinking water purposes.
- Use the food coloring and put a few drops on top of the rock hill as close to the inside wall of the cup as possible. As an example, explain to students that often old wells are used to dispose of farm chemicals, trash, and used motor oil. This practice can show up in the ground water and their drinking water. They will see that the color spreads not only through the rocks, but also to the surface water and into the white sand at the bottom of their cup. This is one way pollution can spread throughout the aquifer over time.
Follow up
Discuss with students other activities that could pollute their aquifer. Assign students the task of locating activities around the school or their own homes that could pollute their drinking water sources if not properly maintained. Allow students to drain off the water in their cups and carry home their container to refill with water and show their parents surface and ground water and how the food coloring illustrates pollution activity above their aquifer can affect all water. Students should discuss with parents what steps they can take as a household to prevent water pollution.
Download PDF VERSION: (237 K PDF FILE, 2 pgs)
|