|
 |
 |
 Water Filtration Water Filtration
Background
Water in lakes, rivers, and swamps often contain impurities that make it look and smell bad. The water may also contain bacteria and other microbiological organisms that can cause disease. Consequently, water from most surface sources must be "cleaned" before it can be consumed by people. Water treatment plants typically clean water by taking it through the following processes:
- aeration;
- coagulation;
- sedimentation;
- filtration, and
- disinfection.
Demonstration projects for the first four processes are included below.
Objectives
To demonstrate the procedures that municipal water plants may use to purify water for drinking.
Materials Needed
- 5 Liters of "swamp water" (or add 2 1/2 cups of dirt or mud to 5 liters of water)
- 1 Two liter plastic soft drink bottle with its cap (or cork that fits tightly into the neck)
- 2 Two liter plastic soft drink bottles, one with its bottom cut off and one with the top cut off
- 1 large beaker (2 cups) or measuring bowl that will hold the inverted two liter bottle or you can use another two liter plastic soft drink bottle with its top cut off so the other bottle will fit inside of it.
- 2 tablespoons of alum (potassium aluminum sulfate available in the spice isle at grocery stores)
- 1 1/2 cups fine sand (white play sand or beach sand)
- 1 1/2 cups coarse sand (multi-purpose sand)
- 1 cup small pebbles (washed, natural color aquarium rocks work best)
- 1 coffee filter
- 1 rubber band
- 1 tablespoon (for the alum)
- 1 large spoon (for stirring)
- A clock with a second hand or a stopwatch
Procedure
- Pour your "Swamp Water" into the two liter bottle with a cap. Have students describe the appearance and smell of the water.
- Aeration the first step in the treatment process, adds air to water. It allows gases trapped in the water to escape and adds oxygen to the water. Place the cap on the bottle and vigorously shake the bottle for 30 seconds. Continue the aeration process by pouring the water into another bottle or the beaker, then pouring the water back and forth between them about 10 times. Once aerated, gases have escaped (bubbles should be gone). Pour your aerated water into your bottle with its top cut off.
- Coagulation is the process by which dirt and other suspended solid particles chemically "stick together" into floc (clumps of alum and sediment) so they can easily be removed from water. Add two tablespoons of alum to the aerated water. Slowly stir the mixture for 5 minutes. You will see particles in the water clinging together to make larger clumps. This makes it harder for them to get through a filter at the plant.
- Sedimentation is the process that occurs when gravity pulls the particles of floc to the bottom of the cylinder. Allow the water to stand undisturbed in the cylinder. Observe the water at 5 minute intervals for a total of 20 minutes. Write down what you see - what is the appearance of the water now? At a treatment plant, there are settling beds that collect floc that floats to the bottom, allowing the clear water to be drained from the top of the bed and continue through the process.
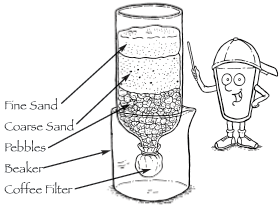
- Construct a filter from the bottle with its bottom cut off as follows (see illustration below):
a. Attach the coffee filter to the outside neck of the bottle with a rubber band. Turn the bottle upside down placing it in a beaker or cut-off bottom of a two liter bottle. Pour a layer of pebbles into the bottle - the filter will prevent the pebbles from falling out of the neck.
b. Pour the coarse sand on top of the pebbles.
c. Pour the fine sand on top of the coarse sand.
d. Clean the filter by slowly and carefully pouring through 3 L (or more) of clean tap water. Try not to disturb the top layer of sand as you pour the water.
- Filtration through a sand and pebble filter removes most of the impurities remaining in water after coagulation and sedimentation have taken place. After a large amount of sediment have settled on the bottom of the bottle of swamp water, carefully - without disturbing the sediment - pour the top two-thirds of the swamp water through the filter. Collect the filtered water in the beaker. Pour the remaining (one-third bottle) of swamp water back into the collection container. Compare the treated and untreated water. Ask students whether treatment has changed the appearance and smell of the water.
Advise students that the final step at the treatment plant is to add disinfectants to the water to purify it and kill any organisms that may be harmful. Because the disinfectants are caustic and must be handled carefully, it is not presented in this experiment. The water that was just filtered is therefore unfit to drink and can cause adverse effects. It is not safe to drink!
Download PDF VERSION: (186 K PDF FILE, 2 pgs)
|

