Installation Instructions for TRIM
1.
Installation of third party software
1.1
Install the Java Runtime Environment (JRE) 1.5
1.3 Install R version 2 or later.
2.1
Installing TRIM for the First Time
2.2
Updating Your TRIM Installation
1. Installation of third party software
TRIM needs the following third
party software to run: Java (1.5), MySQL (4.1), and R
(2.x).
If you do not already have the specified
versions of Java, MySQL, and R installed, please
install the current versions of these products before proceeding with the TRIM
specific installation instructions in Section 2.
Note: if you are not comfortable with software installations, you may want to have an IT support person perform the steps in this section.
1.1 Install the Java Runtime Environment (JRE) 1.5
1. Java 1.4.x or 1.5.x is required to run TRIM. Prior to installing Java, you should determine if you already have a sufficient version of Java on your computer. You can do this one of two ways:
a.
From the start menu, open a Command Prompt window. Then type the command:
java
–version
If the information that is printed starts with the words java version “1.5, then your version is
sufficient and you do not need to install Java.
b. From the start menu, open the Control Panel, and then open Add or Remove Programs. Scroll down through the alphabetical listing to the ‘Js’. If Java 1.5 is installed, it is listed as J2SE Runtime Environment 5.0 Update N, where N is the number of the update. If Java 1.4 is installed, you would see Java 2 Runtime Environment, SE v1.4.2_N, where N is the revision of Java 1.4.2 that you have installed. The latest version available at the time this document was written is 1.4.2._09.
c. If you have Java 1.5 installed you do not need to install Java, so skip to Section 1.2. If you need to install Java, continue with the instructions in this section.
2. Go to http://java.sun.com/j2se/1.5.0/download.jsp to prepare to download the Java runtime environment.
3. Scroll
down and click on the link named “Download
JRE 5.0 Update N”. You will be taken
to a page with a license agreement.
Examine the agreement and if you agree to the terms,
·
click the Accept
License Agreement option,
·
then go to the section
with the heading “Windows Platform - J2SE(TM) Runtime Environment 5.0
Update 5”.
·
Now, click the link that corresponds to your
operating system, e.g., “Windows Offline
Installation, Multi-language”.
4. You will be prompted to save the installation package on your computer. Choose a location in which to save the installation package and save the file. Note that you will be able to delete this file after you are finished installing the software.
5. Execute the Java installation package by using My Computer or Windows Explorer to go to the folder in which you saved the installation package and by double clicking on its icon. The file should be named something similar to jre-1_5_0_05-windows-i586-p.exe.
6. After you double click on the installation package, an installer will start. Follow the prompts of the installer to accept the license agreement and perform a Typical installation. Click Finish when it is done.
7. Note that on Windows, the Java runtime environment is typically installed into a directory similar to C:\Program Files\Java\j2re1.5.0_05.
8. If the above instructions were not sufficient to obtain a successful installation, more detailed information is available at http://java.sun.com/j2se/1.5.0/jre/install-windows.html.
1.2 Install MySQL Version 4.1
TRIM requires MySQL Version 4.1 to run. Note: MySQL Version 5.0 is not supported for use with TRIM, therefore you will need to install version 4.1 even if you already have Version 5.0 installed. Instructions for installing MySQL are provided here.
1. If you have a version of MySQL prior to Version 4.1 installed, follow the steps in
this section, otherwise proceed to Step 2.
a. If you have previously installed MySQL 4.0 or earlier, you must uninstall that version before proceeding with the upgrade.
b. To begin the uninstallation, first stop the service, by typing the following command at the command prompt: NET STOP mysql. (If your service is registered under a different name than mysql, please use that name).
c. Next, remove the service by executing the following command: C:\mysql\bin\mysqld –remove (If MySQL was installed in a different directory, please use the appropriate path e.g. D:\mysql\bin\mysqld --remove)
d. Next, go to Windows Start Menu à Control Panel à Add or Remove Programs.
e. Look for MySQL Servers and Clients xxx and click on Change/Remove.
f. It will ask you Are you are sure you want to remove MySQL Servers and Clients and all its components? Say Yes. Your previous version MySQL will then be uninstalled.
2. Perform the following steps to download the MySQL Version 4.1 installation package:
a. Go to http://dev.mysql.com/downloads/mysql/4.1.html.
b. Scroll down on this page until you see the section Windows Downloads.
c. In the line that starts with Windows Essentials, Click on Pick a mirror.
d. The next page gives you a chance to enter some information about yourself and how you’re using MySQL. You may answer these questions if you wish, or you may click on No thanks, just take me to the downloads.
e. In either case, you should come to a section titled Mirrors in the United States. Click on HTTP next to one of the mirror sites. You may find that choosing a mirror close to you geographically gives you a faster download, but you can click on any one.
f. You will be prompted to save the MySQL Version 4.1 installation package to your computer. Choose a folder and Save the installation package to the folder on your computer.
g. Use My Computer or Windows Explorer to go to the folder in which you saved the installation package. The file should be named something similar to mysql-4.1.13-essential-win.msi.
3. Execute the MySQL Version 4.1 installation package (e.g. mysql-4.1.14-essential-win.msi ) by double clicking on its icon.
a. Once the installation package has started, click Next and follow the prompts to perform a Typical installation.
b. When prompted with setting up an account, you may fill in the information it asks or you may choose to Skip Sign-Up.
c. On the last screen of the installation wizard, there is a checkbox for Configure the MySQL server now. Make sure this is checked before you click Finish. Clicking Finish will start the MySQL Server Instance Configuration Wizard.
4. Make a note of the directory into which MySQL was installed (e.g. C:\Program Files\MySQL\MySQL Server 4.1).
5. On the MySQL Server Instance Configuration Wizard click Next, choose Detailed Configuration for the configuration type and then click Next. When prompted, choose the following options in the wizard:
a. Server Machine, since it would be advisable not to use your computer for other things while TRIM is running. This setting will help MySQL operations (and therefore TRIM) to execute faster.
b. Next, choose the Non-Transactional Database Only option, since TRIM currently does not use transactions. This will avoid requiring MySQL to perform additional operations to ensure transaction compliance.
c. Next, select the Manual Setting option and set the number of concurrent connections to be 15.
d. Next, select the Enable TCP/IP Networking checkbox, and select the default port setting (3306).
e. Select Standard Character Set.
f. Make sure the Install as Windows Service and the Launch the MySQL Server automatically checkboxes are checked and select MySQL as the Service Name. It is suggested that you also choose to Include Bin Directory in Windows PATH.
g. On the following page that starts with Please set the security options, check the Modify Security Settings checkbox, enter a New root password and Confirm. Do not check ‘Enable root access from remote machines’ (this is a security risk). Write down the new password you have set for future reference. Leave the Create an Anonymous Account option unchecked. Be sure to make a note of the root password as you will need this later in the installation process.
h. Once all settings have been selected, you will see a Ready to Execute page with an Execute button at the bottom. If you are satisfied with the selections you made, click Execute. Otherwise, you can use the Back or Cancel buttons and change your selections or start over.
6.
Using mysql from a command prompt: To access the MySQL server directly (this is not a requirement), from a
command prompt window you can log into the MySQL database by typing this:
mysql –u root –p and then
entering the MySQL root password at the prompt.
Once you are logged in, you should see a message that says “Welcome to MySQL
Monitor…..”.
You may issue commands like show
databases; and create database dbname from
here if you need to. However, most users will not need to interact with the
database this way.
1.3 Install R version 2 or later.
1. To obtain the R installation package, do the following:
a. Go to http://cran.us.r-project.org/. On this page you should see a section labeled Precompiled Binary Distributions. Click on Windows (95 and later).
b. On the R for Windows page, click on the link labeled base.
c. On the R-2.1.1 for Windows page (Note: there may be a version later than 2.1.1. by the time you read this, proceed with that version), click on rw2011.exe (note: the 2011 here is the file name for version 2.1.1 only – if the version you are downloading is different, this file name should be adjusted accordingly).
d. After clicking on rw2011.exe you will be prompted to save the installation package to your local disk. Click Save then choose a folder to place it in.
e. Once it is finished saving, click Close,
2. Once you have an installation package (e.g. rw2011.exe), use My Computer or Windows Explorer to go to the folder in which you saved the R installation package. Start the installation process by double clicking on the icon that corresponds to the installation package.
3. In the Setup – R for Windows Wizard, select the Setup Language and click OK, then click Next.
a. Review the license agreement and if you accept it, select the I accept the agreement option and then click Next.
b. Select the location in which you want R installed, and then click Next.
c. On the Select Components page, click Next to accept the default settings.
d. On the Select Start Menu Folder page, set the name you want to use for the folder that will be created on your start menu then click Next.
e. On the Select Additional Tasks page, accept the default settings then click Next. R will then be installed.
f. Make a note of the directory into which R was installed (e.g. C:\Program Files\R\rw2011). You will need this information later in your installation process. When the installation is complete, click Finish.
g. Click Finish when the installation is complete. If you wish to make sure the installation worked, find the R submenu on your Start Menu and choose R 2.1.1. If the application RGui comes up, it is working properly. Close the RGui application – TRIM does not use the RGui, instead it calls R “behind the scenes”.
2. Installation of TRIM
An installer has been developed for TRIM to streamline the download and installation process. The installer will download all needed TRIM files and set up the bat files to run TRIM for you automatically. It also supports updating TRIM as new versions become available.
2.1 Installing TRIM for the First Time
- Download the TRIM installation program and save it to your computer. Note that the installer program is available from the Software Available for Download section of http://www.epa.gov/ttn/fera/trim_install.html.
- Once you have downloaded the installer, double click on it to run it. When the installer starts, you will see a screen labeled TRIM Installer Extractor. Follow these steps to extract the installer:
a. Click on the Next button. You will see a page that allows you to specify a location for the installer (default is C:\triminst). The installer itself is only 62 Kb. If you wish to specify a different location, you may type into the field or use the Browse button.
b. Once you are satisfied with the location of the installer, click the Next button.
c. After the installer has been extracted, a Windows explorer window will appear showing you where the installer has been installed and the installer will start within a few seconds. In addition, an icon called TRIM Installer will have been placed on your desktop. You may run the installer in the future to download TRIM updates by double clicking on the TRIM Installer icon.
d. If the installer does not work, make sure that you can type “java –version” at a command prompt and that it this returns the version of Java you are using. If this does not work, follow the steps appropriate to your operating system to make sure that Java is on your path. But, the Windows installer for Java should have taken care of this for you.
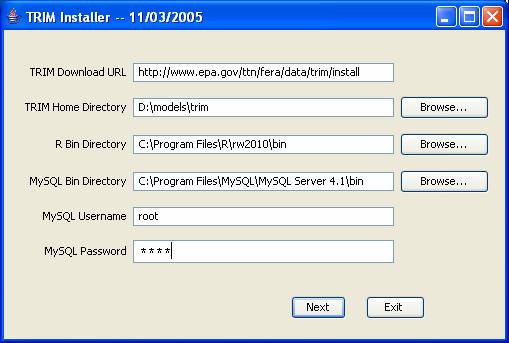
- On the first page of the installer, you select the directories that TRIM needs to know about. These include:
a. The TRIM Download URL, which specifies where to download TRIM from. Typically you will not need to change this setting.
b. The TRIM Home Directory is the directory into which you want to install TRIM. A common location to select is C:\models\TRIM. If the directory you select does not exist, it will be created for you.
c. The R Bin Directory is the bin directory for the R software package, which should already be installed. You may use the Browse button to find the directory. On Windows this is typically a directory like C:\Program Files\R\rw2011\bin.
d. Optionally create a MySQL username to use with TRIM: It is recommended that you create a MySQL username for use with TRIM. To do this:
· From your list of programs, choose MySQL->My SQL Server 4.1->MySQL Command Line Client
· Enter your MySQL root password when prompted (which you specified when you installed MySQL).
· Once you are logged in, you should see a message that says “Welcome to MySQL Monitor…..”.
·
At the mysql prompt
(i.e., mysql > ), type the following command (replacing
USERNAME and PASSWORD with your choices, e.g., "trim" and
"trim"):
GRANT
ALL PRIVILEGES ON *.* TO 'USERNAME'@'%' IDENTIFIED BY 'PASSWORD';
If entered correctly, MySQL will respond with something like "Query OK, 0 rows affected (0.02 sec)".
· If you specify the same username and password on Page 1 of the TRIM installer as shown below, the installer will enter these values as values for the parameters “MYSQL User Name” and “MySQL Password” in each of the TRIM Scenarios.
e. The MySQL Username is a valid username for the MySQL software package. If you have not created a special username for use with TRIM, enter root, otherwise use the username you created for TRIM.
f. The MySQL Password is the password that corresponds to the selected MySQL username. If you created a MySQL username and password to use with TRIM, enter the new password here. Otherwise, enter the password you selected when configuring the MySQL server. If you are unsure of the password, you can try some entries that you think are correct by typing the following from a command prompt window: mysql –u root –p [Return]. You will then be prompted for the password and will be informed of whether you can successfully access MySQL.
g. When you are done filling in the information, the installer should look something like Figure 1. Once you are satisfied with all the entries, click Next.
Figure 1. Page 1 of the TRIM Installer
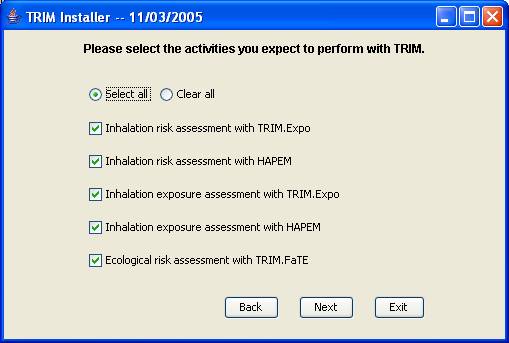
- On the second page of the installer, you specify information about the activities you expect to perform with TRIM. Activate the checkboxes next to the activities you think you will perform. If you are unsure of the activities you plan to perform, click the Select All button at the top of the page. A picture of Page 2 of the installer is shown in Figure 2. If you plan to perform risk or exposure assessments with TRIM.Expo or HAPEM, it is recommended that you install the corresponding software and databases prior to proceeding with the TRIM installation.
Figure 2. Page 2 of the TRIM Installer
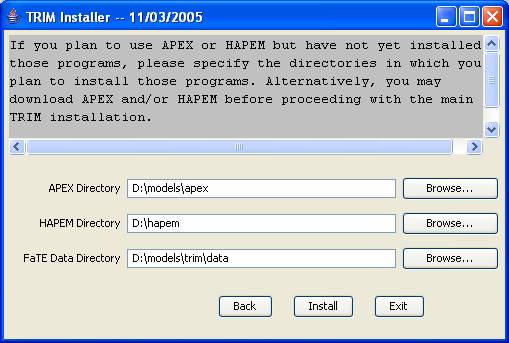
- On the third page of the installer, you specify information about the directories that contain programs and data that are related to TRIM, but are not included as part of the installation package. A picture of Page 3 is shown in Figure 3.
a.
For the APEX
Directory, enter the name for the directory to contain the input and output
subdirectories that will be used for TRIM.Expo-Inhalation
(i.e., APEX). You may use the Browse
button to select the directory, or type it in directly. The APEX executable
program is downloaded automatically by the installer and does not need to be
found under the APEX directory.
Typically the input directory underneath the APEX Directory will contain
directories such as
b.
For the HAPEM
Directory, enter the name of the directory that contains the input and
output subdirectories that will be used for HAPEM, along with the HAPEM
executable. You may use the Browse button to select the directory, or type it
in directly. Typically the input
directory underneath the HAPEM Directory will contain directories such as
Activity Pattern, Add, airqual, Commute, factor, and
Population.
c. For the FaTE Data Directory, enter the name of the directory that will contain the data files for TRIM.FaTE. Typically this will be something like C:\models\trim\data\fate. TRIM will attempt to load the FaTE project file (e.g., training.trp) from this directory. You may use the Browse button to select the directory, or type it in directly. If you are uncertain of what to put, you may leave it blank and fill this in later when performing your ecological risk assessment.
d. Once you are satisfied with your selections, click the Install button. The installer will proceed with downloading the files into the TRIM Home Directory, loading the TRIM projects and scenarios, and configuring those scenarios to use the directories you have selected.
e. Once the installer has completed, it will add a TRIM entry to your All Programs menu that contains the four main programs that come with TRIM (TRIM, DAVE, FaTE, and the Analysis Engine Table).
Figure 3. Page 3 of the TRIM Installer
2.2 Updating Your TRIM Installation
- To update your TRIM installation, run the installer by double clicking on the TRIM Installer shortcut from your desktop. The installer will come up using the settings from the previous run of the installer.
- On the first page of the installer, if you select a new TRIM Home Directory, a new installation of TRIM will be created. If you select the same TRIM Home Directory as you did the first time, the installer will prompt you whether to Reinstall or Update your installation. If you select Reinstall, the installer will download a whole new set of files and will overwrite your current installation. For this case, the same steps will follow as did for the first time installation.
- If you select Update, the install will download only the files that have been updated since your last TRIM update or installation. Once you click Update, a fourth page of the installer will appear and will show you which files will be updated. You may cancel the update by clicking Cancel, or proceed by clicking OK. Once the update is complete, click Exit to exit the installer.
- Note that when you Update your installation, if any TRIM projects have been updated the existing projects will be moved to a new name with “Backup” appended to it, and the newly downloaded project will be loaded using the default name.